
The first thing we do in the morning is check our phones for e-mails, messages, and other notifications. That is the place where most of our communication happens.
It makes e-mail one of the most powerful channels for communication between a brand and its customers.
I am using Sendinblue as an e-mail marketing tool of choice. Today, I want to show you how to start building your mailing list for free using the many tools that Sendinblue has to offer.
I use and recommend Sendinblue because I believe that it’s truly the best e-mail marketing tool for you too. That is why I’ve partnered with them and the links on this page are my referral links.
If you like and choose to go with a paid plan instead of the free one, I will receive a small commission in return. This comes at no extra cost for you at all. It supports the Digital Brand Blueprint and allows me to create more content like this.
🎯 How can email marketing help your business?
You can use e-mail to establish a channel of direct communication with your audience or customers. This helps you build a stronger relationship with them.
- It’s an excellent tool for communication with customers
- It can help you grow your business through automation
- You own your contacts, no matter which service you use
The first step toward creating your e-mail automation system is choosing a mailing service provider. That is how you will be able to manage your contact list and overlook all aspects of e-mail communication.
🎯 Why choose Sendinblue for e-mail marketing?
Sendinblue is a great beginner tool that you can use to start growing your list. When I was fist starting to get into e-mail marketing, I took advantage of their free plan.
The free e-mail plan gives you unlimited time to grow your list without having to pay a subscription fee when you have less than 2000 contacts.
Here are some other benefits you get with Sendinblue:
- Free to use without a time limit if you’re low on budget
- Easily create sign-up or subscription forms
- Build e-mails with a drag and drop editor
- Create and edit your own automation flows
- Schedule and send out promotional campaigns.
This article is divided into five parts. To easily find each specific steps you can follow the numbers in blue brackets marked like this (#).
Part 1: How To Set-up your Sendinblue mailing account
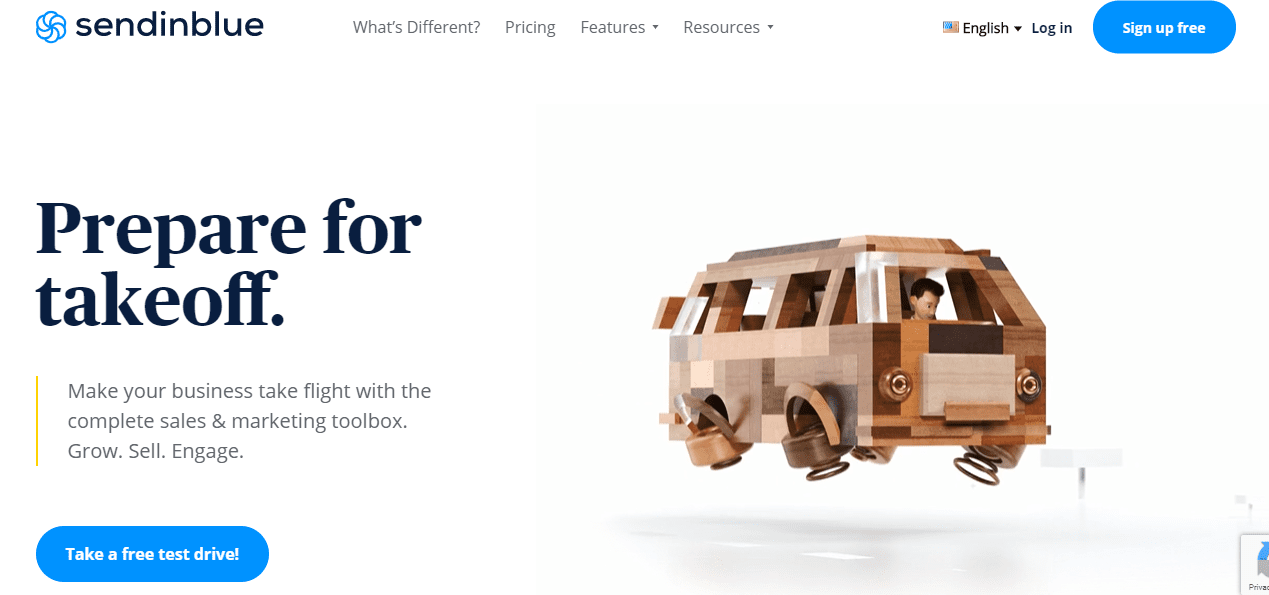
When you visit the official Sendinblue website you will find a button that invites you to create a new profile. (1) Click the button to start setting up your profile.
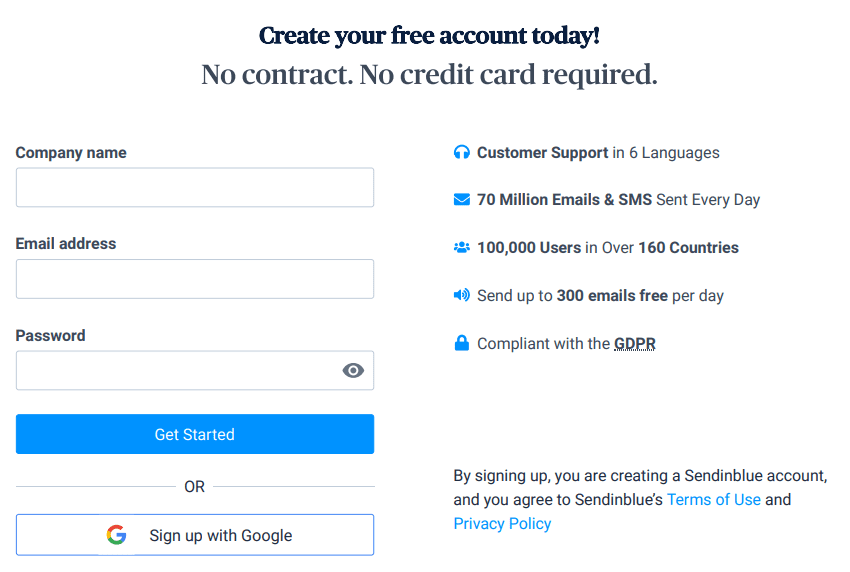
You can immediately set up your profile for free. No credit card or contract required.
Just (2) fill out your company name, contact address, and password. Or alternatively, you can use your Google account to sign up with one click.
Finally, (3) you will get a confirmation e-mail to finish setting up your new account. You will be then redirected to the website where you can add additional information about your business, or you can skip that for now and continue to (4) choose your plan.
Sendinblue Plans & Pricing Review
You can choose one of five plans for your mailing account:
- Free plan to get you started with e-mail marketing
- Lite plan perfect for new marketers
- Essential plan ideal for a growing business
- Premium plan as the best solution for marketing pros
- Enterprise plan for large senders or more specific needs
Additionally, all plans include real-time reporting, e-mail support for you, API and plugins, advanced segmentation, plus much more.
You can check out the full list of features here.
A free plan is chosen for you by default, if you want to immediately upgrade then select your choice. You can select your plan and you’ll be taken to your (5) Dashboard.
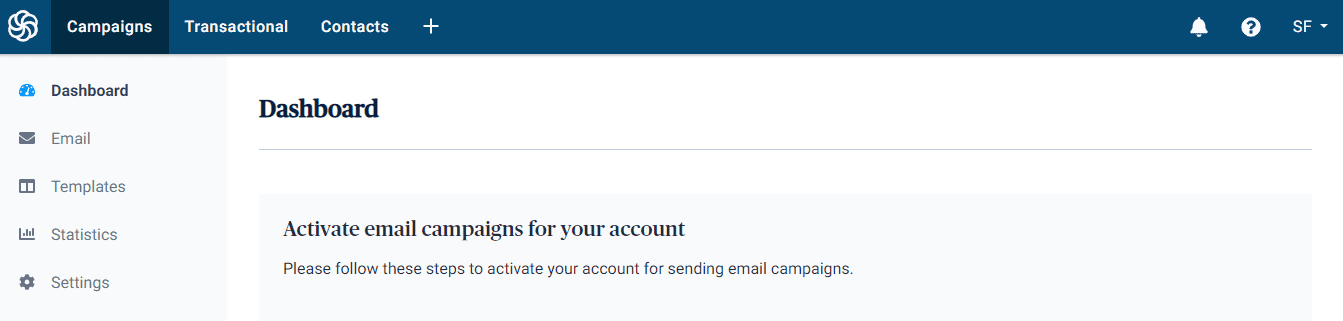
Activate your Sendinblue account and start sending out campaigns
On your dashboard you can see the first 3 steps you need to do to activate your account and start sending emails.
- Complete your profile information ✔
- Import your existing contacts
- Schedule your first campaign
(6) If you haven’t completed your full profile information on sign-up do that now. If you’ve already done that, you can move on to Part 2.
Part 2: How to set up your Contact Lists in Sendinblue
In the second part you will learn how to manage your contacts. If you already have existing contacts, go ahead and click (7) Import Contacts from your Campaigns > Dashboard.
You will be prompted to either upload a .cvs file with your contact list or copy/paste them. Do that now.
If you have no contacts you an move on tho the next step and (8) Create a subscription form to collect new leads.
What are e-mail subscription forms?
Subscription forms are entry points where people can submit their contact information. When a someone fills out a subscription form they will be added to your mailing list as a contact.
Customize your subscription forms to grow your audience and capture details to connect on a personal level.
Steps to create an e-mail subscription form
Collecting new e-mail leads is a big part of e-mail marketing. A common question that people ask is how to start collecting addresses. You can start building a list by creating sign-up or subscription forms.
You can find this option on the same page where you import your contacts or navigate there from the main Menu > Contacts > Forms.
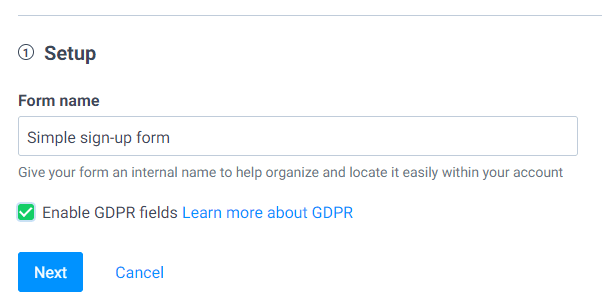
Here is how to create a Sendinblue subscription form:
- Set up your form by choosing a name
- Select whether your form should be GDPR compliant (strongly reccomended)
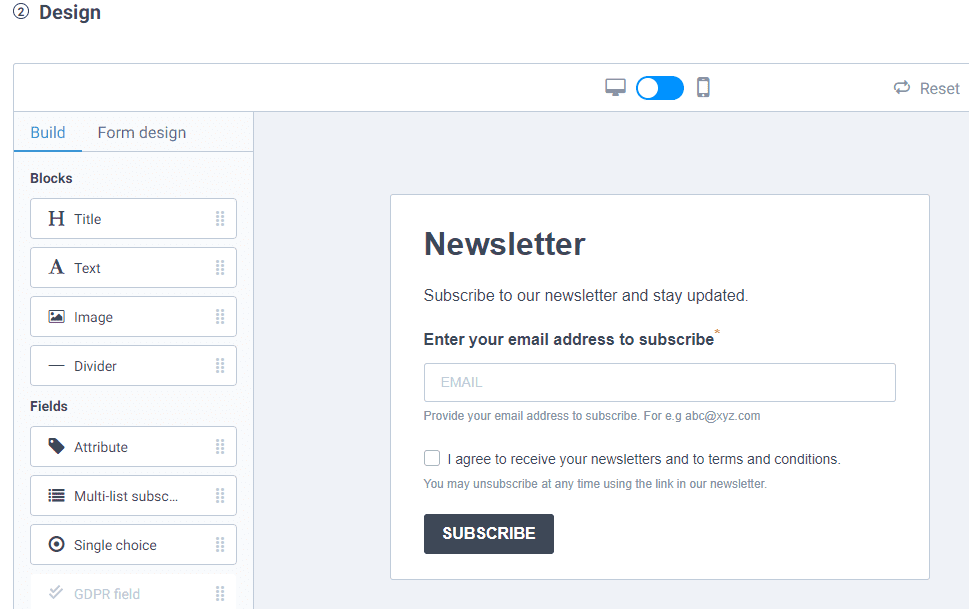
Design your new subscription form by editing the base desing in the drag-and-drop editor:
- Enter an informative Form Title
- Add Text to describe your offer
- Insert Images to showcase your identity
- Add a GDPR field to ensure contact privacy
- Finish by inserting a Subscribe Button
Asking your audience to sign up to your list is an invitation to take the relationship and the trust they have with your brand to the next level. That is why you should carefully craft your forms.
Spend some time thinking about the benefits that people will get when they join your list and use that to grab their attention.
Pro Tip: Keep the form design simple and ask only for the information that you absolutely need. Complicated forms that are hard to understand or ask for a lot of information tend to turn people away.
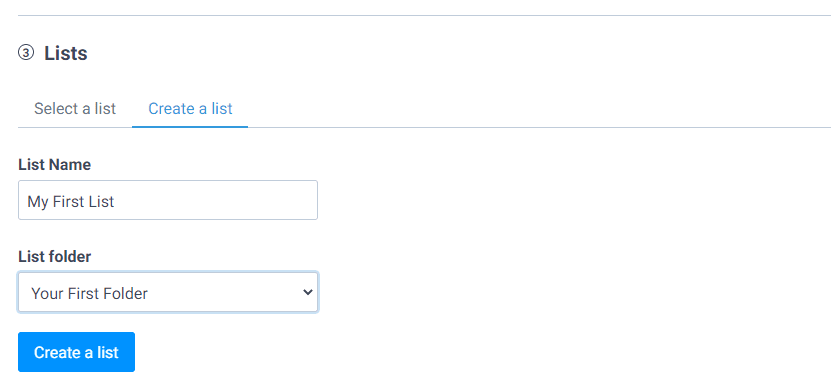
- Choose the name of the list that people will be added to once they submit a form. This is probaly where you will create your first list.
- Choose what happens after a contact has been added to a list. The options are to send a simple confirmation mail, send a double opt-in confirmation mail, or no confirmation mail at all.
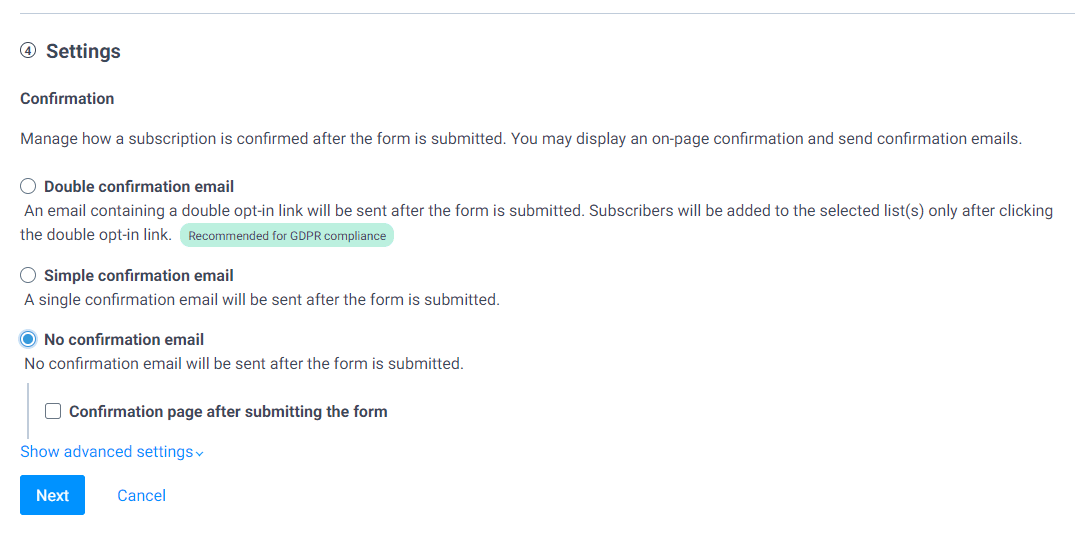
Please note: If you have a brand new profile you will notice that only the no confirmation mail option is available for you. That is because you need to activate your transaction e-mails before you start sending automatic messages. More on that in Step 4, for now you can choose no confirmation and come back to edit that later if you want to.
- Choose the success and error messages that contacts receive after they submit the form.
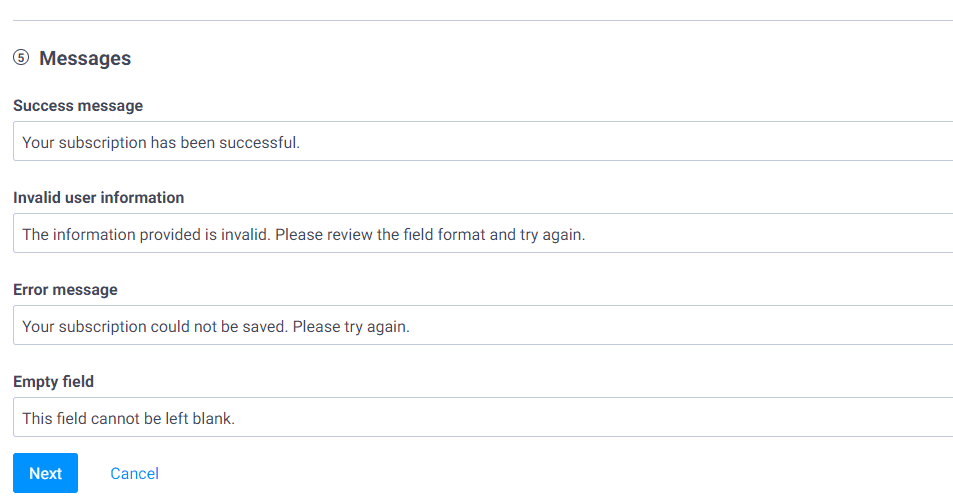
You will see that there are default messages already there for you. Edit these if you think it’s necessary.
- Finally, you can embed and share your form on your website
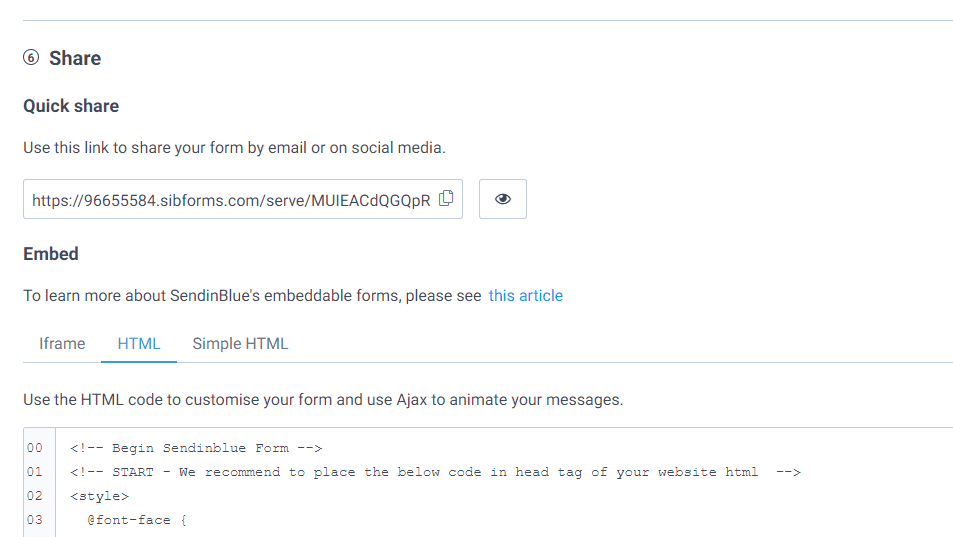
You can use Iframe, HTML, or a click link to embed and share your form on your website.
These are all the necessary steps to build a form. You can create as many forms and contact lists as you need for you website. Different forms can be used to fit your needs.
Privacy Note: To keep everything legal, all of your contacts have to willingly provide their information and allow you to use it. Never buy or add email lists that you don’t own.
Similarly, you cannot share or publish their private information with other entities without explicit permission. For more on this topic, you can read up on the latest GDPR laws about privacy and handling personal information.
Part 3: How to schedule your first e-mail campaign
Sending out e-mail campaigns is the main way that you can communicate with the subscribers on your list. In part 3, you will learn how to set up, design, and send your first campaign.
To (9) schedule your first campaign with Sendinblue go to Campaigns > Dashboard > Create a New Campaign.
There are 4 areas of setting up your campaign: Setup, Design, Recipients, and Final Confirmation.
E-mail Campaign Setup
In the first area you can outline and customize the way your campaign will work. Here is how to do that:

- Give your campaign an internal name to help organize and locate it easily within your account.
- Write a subject line that clearly describes your email content. It will be visible in your recipient’s inbox and is the first content they will see.
- Choose the email address to be shown in your recipients inbox when they receive your campaign. This is by default your sign-up address, but you can add more senders here.
- Enter a From name (e.g. your company name) to help campaign recipients recognize you in their inbox.
- Continue to edit the Advanced Options if needed for even more customization.
Design your E-mail Campaign
The next area of your campaign is the design. Sendinblue offer 3 ways to edit your campaign template:
- Drag & Drop Editor: Create a mobile-friendly (responsive) email by dragging and dropping text blocks, images, buttons and other design elements to create a beautiful email.
- Rich Text Editor: Create simple text emails using a WYSIWYG (What-you-see-is-what-you-get) editor.
- Paste Your Code: Paste your own HTML code, which should be created by a design professional.
Choose the drag-and drop-editor to easily create a mobile friendly campaign for your subscribers. No HTML knowledge is needed!

Once you are done designing click Save & Quit to exit the campaign builder. You can preview your email campaign and send test emails.
When you’re satisfied with your campaign choose the list you want to send it to in area three, and finally confirm your campaign in area four.
Note: Only the first campaign you send out will be reviewed. It can take up to 24 hours for an account manager to review and approve your campaign. This is to ensure quality.
Part 4: How to set-up email automation in Sendinblue
Automated e-mail workflows allow you to create a system for communication based on contact actions and behavior.
That means you build them once, and contacts can enter and experience them when they perform an activity on your website, for example, when they fill out a sign-up form.
SendinBlue Automation enables you to easily create the perfect marketing workflow in just a few clicks.
Here are some examples of workflows:
- Welcome message: Send a series of emails after a subscription or purchase.
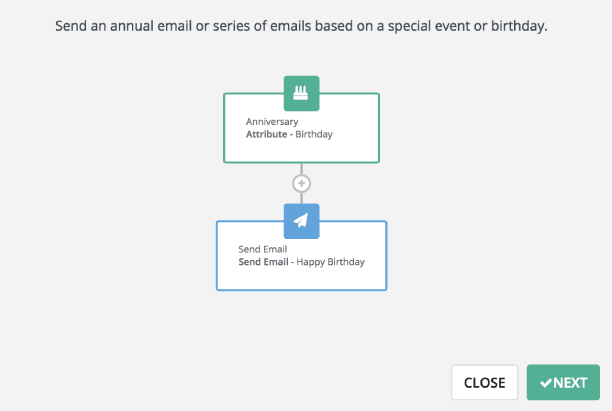
- Anniversary date: Send a gift to your users on their birthday or on the anniversary of the date they subscribed to your website.
- Send a reminder after X days of inactivity.
- Prospect reminder: Send a series of emails based on the behavior of your website users and their reaction to your emails.
- Abandoned basket: Send a reminder to potential customers after X days of them adding an item to their basket without ordering it.
Please note: First you will have to (10) enable transaction emails. This is different than your campaign e-mails. To do that visit Main Menu > Transactional.
Second, to (11) activate automation if you haven’t already, visit https://app.sendinblue.com/account/apps/activate/automation
Creating custom automated workflows
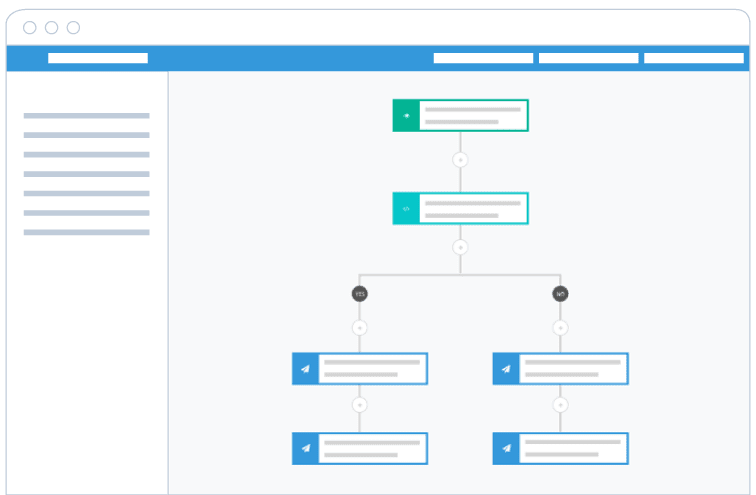
You can create a custom automated workflows by combining multiple triggers or entry points, actions, and conditions.
To do so go to Main Menu > Automation > (12) Create a Workflow.
- Select workflow type (Custom)
- Name your workflow
- Add a description
- Customize automation entry, actions and conditions (read below)
Automation entry points and triggers
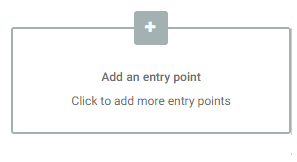 When a contact or customer performs an activity on your website, they trigger, or in other words, they enter an automated flow of e-mails.
For example, when someone joins a list, they automatically get an e-mail with a welcome message.
You can add your first trigger here by clicking + Add an entry point.
Here are some examples that you can use as triggers:
- “A contact visits a page“: you can filter contacts based on them visiting a particular page or group of pages
- “A contact clicks on a link“: you can filter contacts based on them clicking on a link or group of links
- “A contact submits a form“: to filter the contacts who submitted a sign-up form or any other form that you’ve created
- “Another event happens“: it is possible to create custom events depending on your needs (for example, for e-shop order tracking)
Adding automated actions to workflow
Actions are the building blocks of your e-mail automation. They define what happens during the workflow.
For example, when a workflow is triggered, the next actions are performed: 1) Add contact to list, 2) send out a welcome e-mail, 3) wait for two days, 4) send out follow-up e-mail, and so on.
Add and customize the actions that happen when someone enters your workflow here. When you’re done click save and Activate Workflow.
Actions based on Conditions
The workflow can also contain “conditions” that are filters for performing actions based on customer behavior.
For example, if contact opened Mail A, then send out Mail B. If contact didn’t open Mail A, then send out Mail C.
Note: Setting conditions based on behavior is for more advanced users. It is not something you should be thinking at the start, but I had to mention it here just so that you’re aware of it. For now, focus on growing your list, and you can worry about expanding later.
Email Automation Example
Let’s say that you own an online shop and want to create a workflow that will send one or more emails when a contact has visited one of the product pages on your website. This is called a page visit automated workflow.
To create this type of automation, the first step is to define the starting point, i.e. the product URL that will trigger the workflow when the web pages are visited by an identified contact.
Next, with the help of your email tool Sendinblue, you specify the actions that will be performed after the visit. For example, sending an email reminder that the product is still in stock, or a cross-promotion email offering related products.
Finally, based on how your contact interacts with the emails you’ve sent them, you can further branch out your mailing with conditions. These conditions reflect the interaction, like if the contact opened your previous mail or if they clicked the call to action after opening.
Part 5: Running promotions and growing your contact list
Remember to start simple and expand from there. Growing a list is beneficial for your brand because it’s something you own no matter what. Here are some tips to make your e-mail marketing campaigns awesome:
- Set goals and objectives where you define what you want to accomplish with your email marketing.
- Create target audience profiles to understand the people that you’re trying to connect with.
- Make sure that the design and content of your e-mails are clean, interesting, and trustworthy.
- Never spam or send too many campaigns in a short period.
- Pay attention to your e-mail marketing analytics to learn more about what works.
5 Tips for growing your e-mail subscribers list

Here are five ways you can start growing your e-mail list right away:
- Get in touch with people that you already know and might be interested in your updates.
- Add sign-up forms to your most visited pages where people can join for more content from you.
- Post a call to action on your social media profiles and invite your followers to join.
- Create and offer something in return for people that join your list. (For example, ebook, case study, training, course, etc.)
- Reach out to people from your community on the web and social media, and direct them toward your content or offers.
Once you have a few contacts in your pocket, you can start working on your e-mail campaigns and automation.
Keeping a content calendar is a good way to plan, organize, and schedule specific pieces of content or campaigns that you will produce and send out to your audience for a given period.
Features that Sendinblue offers
- Email Marketing: Get the word out and sell more with sleek email messages that you can design in no time.
- SMS Marketing: Communicate more directly with customers for urgent messages or time-sensitive offers.
- CRM: Build stronger relationships by keeping track of all your customer details in one place.
- Marketing Automation: Save time and boost performance by automating your segmentation and marketing messages.
- Chat: Be there for customers instantly when they have a question while browsing your site.
- Transactional email: Step up the design, engagement, and deliverability of your transactional email messages.
- List Segmentation: Get more engagement by sending your marketing messages to a more targeted audience.
- Landing Pages: Create a more targeted visitor experience with dedicated pages for each of your campaigns.
- Signup Forms: Grow your email contact list with custom forms that you can integrate in your website.
- Facebook Ads: Launch Facebook ads from your account to retarget contacts or reach new audiences based on your contact lists.
- Retargeting: Show ads to your website visitors as they browse other websites and bring them back to convert
- Analytics Reports: Follow your email performance and learn what works with detailed statistics for each campaign.
- Email Heat Map: Visualize how contacts read and engage with your emails to improve future campaign designs.
- A/B Testing: Boost performance by testing two ideas in your email and letting data choose the best one.
- Send Time Optimization: Send at the perfect time with just one click using our machine learning-powered send time algorithm.
- API: Integrate Sendinblue features into any tool or product, regardless of your technical setup.
- Plugins: Get more from the tools you use by connecting them with Sendinblue.
- Much More